Category Archives: IT Stuff

Java: Pass By Value or Pass By Reference

Data is shared between functions by passing parameters. Now, there are 2 ways of passing parameters:

  • Passing by value: this method copies the value of actual parameter. The called function creates its own copy of argument value and the use it inside the code. As soon as the work is done on the copied value, the original parameter does not see any change.
  • Passing by reference: the pass by reference method passes the parameters as a reference(address) of the original variable. The called function does not create its own copy, rather, it refers to the original values only. Hence, the changes made in the called function will be reflected in the original parameter as well.

Java follows the following rules in storing variables:

  • Local variables like primitives and object references are created on Stack memory
  • Objects are created on Heap memory

Java always passes arguments by value, NOT by reference.

So how is it that anyone can be at all confused by this, and believe that Java is pass by reference, or think they have an example of Java acting as pass by reference? The key point is that Java never provides direct access to the values of objects themselves, in any circumstances. The only access to objects is through a reference to that object. Because Java objects are always accessed through a reference, rather than directly, it is common to talk about fields and variables and method arguments as being objects, when pedantically they are only references to objectsThe confusion stems from this (strictly speaking, incorrect) change in nomenclature.

So, when calling a method:

  • For primitive arguments (intlong, etc.), the pass by value is the actual value of the primitive (for example, 3)
  • For objects, the pass by value is the value of the reference to the object

So if you have doSomething(foo) and public void doSomething(Foo foo) { .. } the two Foos have copied references that point to the same objects.

Naturally, passing by value a reference to an object looks very much like (and is indistinguishable in practice from) passing an object by reference.
Tagged

Algorithm complexity and Big O notation

Every system transform data into output and that’s why is important to understand the efficiency of our algorithms and data structures according to each solution. 

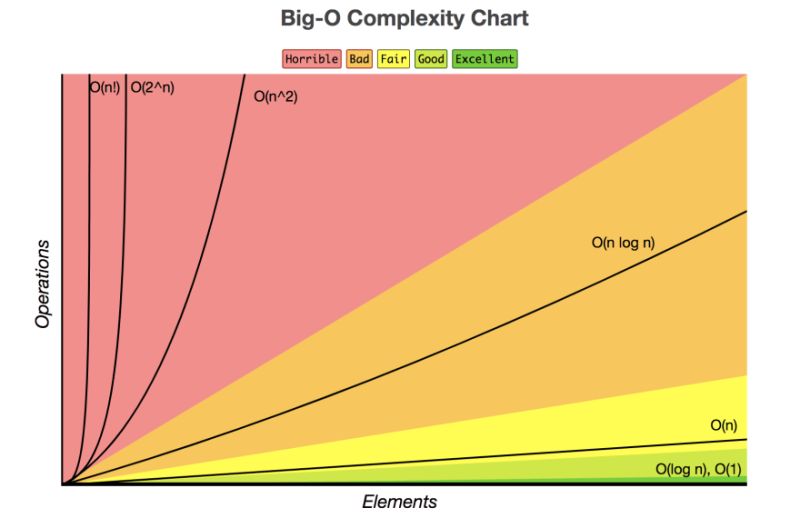
Big O Notation measures the efficiency of an algorithm according to its time and space complexities. The input size of a function can increase linearly and we should be aware of what’s is going to happen with the system in the worst-case scenario. Time complexity is denoted O(…) where the three dots represent some function. Usually, the variable n denotes the input size.

The commonest runtime complexities are: 

  • O(1) Constant Runtime: the running time of a constant-time algorithm does not depend on the input size
  • O(log n) A logarithmic algorithm often halves the input size at each step. The running time of such an algorithm is logarithmic because log2 n equals the number of times n must be divided by 2 to get 1.
  • O(n) A linear algorithm goes through the input a constant number of times.
  • O(n log n) This time complexity often indicates that the algorithm sorts the input because the time complexity of efficient sorting algorithms is O(n log n). Another possibility is that the algorithm uses a * data structure where each operation takes O(log n) time
  • O(n^2) A quadratic algorithm often contains two nested loops
  • O(n^3) A cubic algorithm often contains three nested loops
  • O(2^n) This time complexity often indicates that the algorithm iterates through all subsets of the input elements. For example, the subsets of {1, 2, 3} are ∅, {1}, {2}, {3}, {1, 2}, {1, 3}, {2, 3}, and {1, 2, 3}
  • O(n!) This time complexity often indicates that the algorithm iterates through all permutations of the input elements. * For example, the permutations of {1, 2, 3} are (1,2,3), (1,3,2), (2,1,3), (2,3,1), (3,1,2), and (3,2,1).

And why should we care about Big O Notation? For large applications that manipulate a large amount of data, it’s really important to perform this analysis since inefficient algorithms will impact the performance of the system.  Be aware of the effect of the data structures that you’re using in an algorithm since each one manipulates data in memory and performs operations in different ways.

NP-hard problems are an important set of problems, for which no polynomial algorithm is known.

Tagged , ,

Spring 4+ with Ehcache 3.x

This post describes an example of using Ehcache with a Spring MVC application deployed on Tomcat (not using Spring boot). It is a legacy app that needs to be upgraded.

The dependencies are:

<dependency>
    <groupId>javax.cache</groupId>
    <artifactId>cache-api</artifactId>
    <version>1.1.1</version>
</dependency>
<dependency>
    <groupId>org.ehcache</groupId>
    <artifactId>ehcache</artifactId>
    <version>3.8.1</version>
</dependency> 

Application context must be updated in this way:

<!-- ***** CACHE CONFIGURATION v.3 ***** -->
<cache:annotation-driven cache-manager="ehCacheManager" />
<bean id="ehCacheManager" class="org.springframework.cache.jcache.JCacheCacheManager">
  <property name="cacheManager">
    	<bean class="org.springframework.cache.jcache.JCacheManagerFactoryBean" 
        p:cacheManagerUri="classpath:ehcache.xml" />
  </property>
</bean>

The method must be annotated with @Cacheable so that Spring will handle the caching. As a result of this annotation, Spring will create a proxy of the NumberService to intercept calls to the square method and call Ehcache.

This is how to annotate the method (a service or a Dao implementation) providing the cache alias and the key for the cache:

@Cacheable(value = "retrieveUserIdOfMYGroup", key = "#userId")
public ArrayList<Integer> retrieveUserIdOfMYGroup(int userId) {
    [...]
}

Now, ehcache.xml config that is completely different than the previous version of ehcache (this is a simple config):

<?xml version="1.0" encoding="UTF-8"?>
<config xmlns:xsi="http://www.w3.org/2001/XMLSchema-instance"
    xmlns="http://www.ehcache.org/v3"
    xmlns:jsr107="http://www.ehcache.org/v3/jsr107"
    xsi:schemaLocation="
            http://www.ehcache.org/v3 http://www.ehcache.org/schema/ehcache-core-3.0.xsd
            http://www.ehcache.org/v3/jsr107 http://www.ehcache.org/schema/ehcache-107-ext-3.0.xsd">
	
	<cache-template name="myDefaults">
	<listeners>
            <listener>
                <class>com.afm.web.configuration.CacheLogger</class>
                <event-firing-mode>ASYNCHRONOUS</event-firing-mode>
                <event-ordering-mode>UNORDERED</event-ordering-mode>
                <events-to-fire-on>CREATED</events-to-fire-on>
                <events-to-fire-on>EXPIRED</events-to-fire-on>
                <events-to-fire-on>EVICTED</events-to-fire-on>
            </listener>
        </listeners>        
	</cache-template>
	
	<!-- @Cacheable(value = "retrieveUserIdOfMYGroup", key = "#userId") -->
	<cache alias="retrieveUserIdOfMYGroup" uses-template="myDefaults">
		<heap unit="entries">200</heap>
	</cache>
            
</config>

Cache listeners allow implementers to register callback methods that will be executed when a cache event occurs and print on the log appender. This is how class CacheLogger is implemented:

public class CacheLogger implements CacheEventListener<Object, Object> {

  protected final Log LOG = LogFactory.getLog(getClass());
	
	@Override
	public void onEvent(CacheEvent<? extends Object, ? extends Object> cacheEvent) {
		LOG.info("Key: " + cacheEvent.getKey()  
      + " | EventType: " + cacheEvent.getType() 
      + " | Old value: " + cacheEvent.getOldValue() 
      + " | New value: " + cacheEvent.getNewValue());		
	}

}
Tagged , ,

React.js: fill options of Autocomplete with API results

The autocomplete is a normal text input enhanced by a panel of suggested options.  Autocomplete is a feature that helps in predicting the rest of the word typed by a user. Autocomplete is helpful from the user as well as the user experience perspective. It makes users happy by saving their time and also by offering them several choices.

In this case, I fill the Autocomplete with the results of Google Ads locations an this is the expected result:

For first, import Autocomplete component (of course must be installed):

import Autocomplete from '@material-ui/lab/Autocomplete';
// or
import { Autocomplete } from '@material-ui/lab';

Define the object that will be used to collect the Autocomplete options:

const locationResults = [];

This is how Autocomplete is defined:

let autocompleteBox = <Grid item xs={12} md={12} sm={12} lg={12}>
    <Autocomplete
        id="autocompleteLocations"
        value={this.state.autocompleteValue}
        options={locationResults} 
        getOptionLabel={option => option.locationName}      
        autoHighlight={true}   
        autoSelect={true}                    
        style={{ width: 600, marginTop: 20 }}                        
        clearOnEscape                        
        onChange={(event, autocompleteValue) => this.setState({ autocompleteValue })}
        renderInput={params => <TextField {...params} label="Search location" variant="outlined" onChange={this.handleAutocompleteTextChange.bind(this)} />}
    />

    </Grid>;

Once the user enters some text on Search location TextField, this function is called (I expect user inserts at least 3 chars before call the API):

/**
 * On change text of Autocomplete
 */
handleAutocompleteTextChange = (event) => {

    this.setState({
        query: event.target.value
    }, () => {

        if (this.state.query && this.state.query.length > 3) {
            this.getLocations(this.state.query);
        }
    })
}

This is how the function getLocations() is implemented:

/*
 * API Function to retrieve locations
 */
getLocations = (locationQuery) => {

    axios(
        {
            method : 'get', url: GET_LOCATIONS, auth: this.state.userInfo.apiAuth, params: {
            user: this.state.userInfo.username,
            customerId: this.state.clientCustomerId,
            query: locationQuery
        }
    }).then(res => {

        if (res.status == 200) {
            this.setState({results: res},()=>{
                this.forceReloadOrganization(res)
            });
        } else {
            this.setState({results: []});
        }

    }).catch(error => {
        this.setState({results: []});
        console.log(JSON.stringify(error));
    });

}

The last thing is to update the options on Autocomplete:

/**
 * Reload the results after API call
 */
forceReloadOrganization = (results) => {
    {

        if ( results.data != "" ) {
            results.data.map(item => {

                locationResults.push({
                        id:item.location.id,
                        type: item.location.displayType,
                        locationName:item.canonicalName + ": " + item.location.displayType + " (" + item.location.id + ")"
                    }
                )
            });
        }

    }
}
Tagged ,

Mongo Replica set with docker-compose

replica set in MongoDB is a group of mongod processes that maintain the same data set. Replica sets provide redundancy and high availability and are the basis for all production deployments. Replication provides redundancy and increases data availability. With multiple copies of data on different database servers, replication provides a level of fault tolerance against the loss of a single database server. A replica set contains several data bearing nodes and optionally one arbiter node. Of the data-bearing nodes, one and only one member is deemed the primary node, while the other nodes are deemed secondary nodes.

The primary node receives all write operations. A replica set can have only one primary capable of confirming writes with { w: "majority" } write concern. By default, clients read from the primary [1]; however, clients can specify a read preference to send read operations to secondaries.

Doing it with docker-compose is pretty simple. The first step is to create the docker-compose.yml configuration file:

version: "3"
services:
  mongo1:
    hostname: mongo1
    container_name: localmongo1
    image: mongo:latest
    volumes:
      - mongodb1-data:/data/db
      - mongodb1-config:/data/configdb
    expose:
    - 27017
    ports:
      - 27011:27017
    restart: always
    entrypoint: [ "/usr/bin/mongod", "--bind_ip_all", "--replSet", "rs0" ]
  mongo2:
    hostname: mongo2
    container_name: localmongo2
    image: mongo:latest
    volumes:
      - mongodb2-data:/data/db
      - mongodb2-config:/data/configdb
    expose:
    - 27017
    ports:
    - 27012:27017
    restart: always
    entrypoint: [ "/usr/bin/mongod", "--bind_ip_all", "--replSet", "rs0" ]
  mongo3:
    hostname: mongo3
    container_name: localmongo3
    image: mongo:latest
    volumes:
      - mongodb3-data:/data/db
      - mongodb3-config:/data/configdb
    expose:
    - 27017
    ports:
    - 27013:27017
    restart: always
    entrypoint: [ "/usr/bin/mongod", "--bind_ip_all", "--replSet", "rs0" ]

volumes:
  mongodb1-data: {}
  mongodb1-config: {}
  mongodb2-data: {}
  mongodb2-config: {}
  mongodb3-data: {}
  mongodb3-config: {}
  proftpd-home: {}

At this point, docker must be started:

$ docker-compose up 
# or
$ docker-compose up -d

At this point, enter in one mongo bash and access to mongo console:

$ docker exec -it localmongo1 /bin/bash
$ mongo

The last step is to run the DB replica set initialization:

rs.initiate(
  {
    _id : 'rs0',
    members: [
      { _id : 0, host : "mongo1:27017" },
      { _id : 1, host : "mongo2:27017" },
      { _id : 2, host : "mongo3:27017" }
    ]
  }
)

Now, mongo is ready to accept a connection on port 27011 and, as soon as a DB / collection / document is created or updated, it will be replicated on secondary servers.

Tagged ,

Java: Sort a list of objects according to matching string/pattern

I need to sort a list of objects in which the matching items come up and others will go down so. For instance, a list of objects on which all the labels are in alphabetical order except for all the values that start with P that will be put on the top of the list.

I just need to create a new Comparator class instead of creating an anonymous Comparator, like this:

Collections.sort(result, new Comparator< MyObject>() {
    @Override
    public int compare(final MyObject o1, final MyObject o2) {
 
        // Special case to put "P" in front of the list
        if(o1.getLabel().startsWith("P")) {
            return o1.getLabel().startsWith("P}")? o1.getLabel().compareTo(o2.getLabel()): -1;
        } else {
            return o2.getLabel().startsWith("P")? 1: o1.getLabel().compareTo(o2.getLabel());
        }
 
    }
});

On which MyObject is defined in this way:

class MyObject {
    private String label;
    private String value;
    
    // getter an setter
}
Tagged

Import SQL file using pgAdmin

I have a docker Postgres image and I want to import the data from another Postgres db. The first thing I have done is to create a pg_dump on the remote server and then I have tried to import it. The problem is that output generated is simple SQL file and, if I import this file on pgAdmin I get an error:

pg_restore: [archiver] input file appears to be a text format dump. Please use psql.

psql is not installed on my Mac because I am running it as a docker image and the file exported is using COPY to import values instead of INSERT.
The solution I have found is to export the db using –column-inserts flag:

$ pg_dump --column-inserts -U user db_test > db_test.2020-01-02_insert.sql

–column-inserts will dump as insert commands with column names.

Tagged

Install MySQL server with Docker Compose

Inside a new directory, create a data directory and docker-compose.yml with these rows:

version: '3'

services: 
  db:
    container_name: docker-local-mysql
    image: mysql:5.7.21
    volumes:
      - "./data:/var/lib/mysql"
    restart: always
    ports:
      - 3306:3306
    environment:
      MYSQL_ROOT_PASSWORD: password

To start the container, run docker-compose up -d. To stop & remove the container, run docker-compose down.

To connect from a MySql client use this:

Host: 127.0.0.1
Username: root
Password: password
Port: 3306
Tagged ,

Warning: setlocale: LC_CTYPE: cannot change locale (UTF-8): No such file or directory

After a recent Ubuntu update, I get this error. What finally helped was putting to the file /etc/environment:

LC_ALL=en_US.UTF-8
LANG=en_US.UTF-8

For some reason, it was missing. The outputs for locale and other commands appeared like the variables were properly defined. In other words, don’t take for granted all the basic stuff is declared where it should be declared.

Tagged

How to fix a locale setting warning from Perl and/or *nix bash?

Perl is sometime called by a *nix script and, after an update I get recently this warning message (in particular when I run apt or npm command):

perl: warning: Setting locale failed.
perl: warning: Please check that your locale settings:
	LANGUAGE = (unset),
	LC_ALL = (unset),
	LC_CTYPE = "UTF-8",
	LANG = "en_US.UTF-8"
    are supported and installed on your system.
perl: warning: Falling back to a fallback locale ("en_US.UTF-8").
locale: Cannot set LC_CTYPE to default locale: No such file or directory
locale: Cannot set LC_ALL to default locale: No such file or directory

This can be fixed simply adding the following lines to your bashrc or bash_profile on the host machine:

export LC_CTYPE=en_US.UTF-8
export LC_ALL=en_US.UTF-8
Tagged ,